

Getting Your Home Back After Nature Hits Hard
When a major storm rolls through, your home takes the beating that was meant for you. That’s exactly how it should be. Your house is designed to be the shield that keeps your family safe. But after the winds die down and the hail stops falling, that shield often needs serious attention.
At Roof Panther, we’re a family-owned roofing contractor in Champaign that has handled storm damage restoration throughout Central Illinois for years. We know this area’s weather, we know how insurance claims work, and we know how to get your home properly repaired without the chaos that usually follows a major storm.
I’ve walked hundreds of properties in Illinois after storms, from minor wind events to significant tornado damage, and the one constant is this: acting quickly and correctly makes the difference between a manageable repair and a cascading nightmare of secondary damage.
Let’s cut through the confusion and talk about what actually matters when your home gets hit.
The Hidden Dangers of Untreated Storm Damage
The most common mistake homeowners make after a storm is addressing only what’s obvious. A missing shingle gets attention. A dented gutter gets noticed. The problems you can’t see keep getting worse in the background.
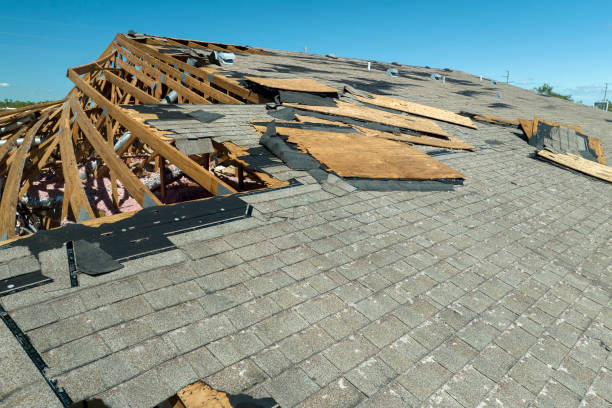
What starts as a small roof breach can lead to:
Rotted roof decking requiring complete replacement
Mold growth throughout attic systems (remediation often costs $2,000-8,000)
Damaged insulation that loses its R-value as it absorbs moisture
Structural damage as water follows framing deeper into the house
Ceiling and wall damage that may not appear for weeks
The pattern is consistent: unaddressed storm damage develops secondary problems that cost three to five times the original repair within 18 months. A $1,500 roof repair that gets put off can easily become a $6,000 problem by next year.
Types of Storm Damage
Different storms create different damage patterns. Knowing what to look for helps you assess your situation accurately and document it properly for insurance.
Wind Damage
Common Wind Damage Signs:
Missing, lifted, or curled shingles
Shingles with broken seals that lie flat but are no longer adhered
Damaged ridge caps and hip shingles, which take the most direct wind exposure
Torn or displaced flashing around chimneys, skylights, and pipe penetrations
Soffit and fascia damage from uplift forces
Damaged or missing gutter sections
Wind damage is particularly tricky because it often creates vulnerabilities without causing immediate leaks. A roof that survives one storm may fail during the next one because the system has already been weakened.
Hail Damage
Identifying Hail Damage:
Dark spots or bruising on shingles where granules have been knocked loose
Exposed asphalt mat where the protective granule layer is missing
Cracked or broken shingles from larger hailstones
Dented gutters, downspouts, and metal flashing
Damaged window screens and dented A/C condenser fins
The granules on asphalt shingles aren’t decorative. They protect the shingle from UV degradation. Once hail knocks them loose, the shingle starts deteriorating faster than it should. A hail-damaged roof that isn’t addressed will typically fail five to seven years earlier than its expected lifespan.
Water Intrusion and Flooding
Heavy rains that overwhelm your home’s water management systems create their own set of problems.
Water damage Indicators:
Water stains on ceilings or walls, usually yellowish or brownish
Bubbling or peeling paint and wallpaper
Warped or buckled flooring
Musty odors indicating mold growth has started
Doors or windows that suddenly stick or won't close properly
Visible mold, which typically appears 24-72 hours after water exposure
Water damage moves fast. What’s a straightforward dry-out on day one becomes a mold remediation project by day four. Speed matters here more than with any other type of storm damage.
Debris Impact
Flying or falling debris during storms can punch directly through your exterior envelope.
Impact damage signs:
Visible punctures through roofing materials
Cracked or broken siding panels
Damaged fascia, soffit, or trim
Broken windows
Dents or holes in gutters and downspouts
Even small punctures allow more water intrusion than most homeowners expect. A half-inch hole in your roof can admit several gallons of water during a moderate rainfall, and that water travels along structural members before it shows up anywhere visible.
The Critical First Steps After a Storm
When the storm has passed and it’s safe to assess your property, these steps help prevent further damage and set up a smoother claims process.
Safety First
Before anything else:
Stay clear of downed power lines and assume all of them are live
If you smell gas, leave immediately and call your utility company
Watch for unstable structures or hanging debris
Use proper footwear and caution on wet or damaged surfaces
No property is worth your safety. Leave severely damaged structures to professionals until they’ve been evaluated.
Document Everything
Thorough documentation is the foundation of a good insurance claim:
Photograph and video all visible damage, both exterior and interior
Get wide shots showing overall condition and close-ups of specific damage
Document any damaged personal property
Keep a written log of damage-related events, conversations, and expenses
Don't throw anything away until an adjuster has seen it
Most insurance disputes trace back to inadequate documentation. The more thoroughly you record the damage, the stronger your position if questions come up later.
Emergency Repairs
Some temporary measures can prevent significant worsening of your situation:
Tarp damaged roof areas to stop active water intrusion
Board up broken windows or doors
Place buckets or plastic sheeting to protect interior contents
Extract standing water as quickly as possible if there's interior flooding
Keep all receipts for emergency materials and labor. These costs are typically reimbursable under most homeowner policies. Photograph the damage before making temporary repairs, and photograph the repairs themselves.
Notify Your Insurance Carrier
Contact your insurer as soon as it’s safely possible:
Get your claim number and adjuster contact information
Ask about your policy's specific reporting timeline requirements (usually 24-72 hours)
Clarify what emergency measures are covered before permanent repairs begin
Ask about advance payment options for immediate needs
Working With Your Insurance Company
The claims process has more moving parts than most homeowners realize, and the initial settlement offer is often not the final word.
Understanding Your Coverage
Homeowner policies vary significantly:
Replacement cost vs. actual cash value. This is the single biggest factor in how much you receive. Replacement cost pays what it actually costs to repair or replace. Actual cash value subtracts depreciation, which can mean a fraction of the real cost.
Wind and hail deductibles. Many Illinois policies have a separate, higher deductible specifically for wind and hail claims. Know yours before you file.
Code upgrade coverage. When you replace older components, current building codes may require upgrades beyond what was originally there. Some policies cover this, some don't.
Additional living expenses. If your home is temporarily uninhabitable, your policy may cover hotel and meal costs while repairs are underway.
The Inspection
An insurance adjuster will examine the damage and produce an estimate using standardized pricing software. A few things to know about this process:
Having your contractor present during the inspection tends to result in a more complete assessment. Your contractor and the adjuster can discuss technical details directly, which prevents items from being overlooked. Initial estimates frequently miss damage that becomes apparent once work begins, and those items can be added through a supplement request later.
Supplements
Most storm damage claims require supplemental requests after the initial estimate:
- Hidden damage discovered during repairs
- Code-required upgrades omitted from the initial estimate
- Material price increases between the estimate date and actual repairs
- Items that require closer inspection to identify
Properly documented supplement requests commonly increase claim settlements by 20-30%. This isn’t about getting more than you’re owed. It’s about getting what you’re actually owed for the real cost of proper repairs.
Choosing the Right Contractor
Storm damage brings out both excellent contractors and opportunistic ones. Knowing the difference protects you.
Red Flags
Be cautious of any contractor who:
Shows up at your door unsolicited immediately after a storm
Pressures you to sign a contract or assignment of benefits form on the spot
Asks for a large deposit upfront (more than 10-20% is a warning sign)
Has no verifiable local address or shows up with out-of-state plates
Offers to "cover your deductible" (this is insurance fraud, and it puts you at legal risk too)
Has no online presence, reviews, or references you can actually check
Storm chasers follow severe weather events from market to market. They do the job quickly and move on, leaving you with no local recourse when problems develop six months later.
What to Look For Instead
An established local presence and verifiable reputation
Experience working with insurance claims and adjusters
Proper Illinois contractor licensing and insurance, including workers' compensation
Manufacturer certifications for the materials they install
Clear, itemized written estimates before any work starts
Realistic timelines and clear communication throughout the project
A contractor worth hiring will guide you through the entire process, not just show up to collect a check.
The Complete Restoration Process
Emergency Services
The immediate response focuses on stopping further damage:
Tarping damaged roof areas
Boarding up broken windows or doors
Water extraction if interior flooding occurred
Placement of drying equipment
Security measures if structural damage has compromised the home
These services need to be available around the clock. Storms don’t happen during business hours, and secondary damage doesn’t wait.
Assessment and Documentation
A thorough evaluation before any permanent work begins:
Comprehensive inspection of all potentially affected areas
Documentation of all visible damage with photos and written notes
Moisture testing in walls, ceilings, and floors for hidden water intrusion
Structural assessment where needed
Development of a detailed restoration scope
This goes well beyond what’s visible to the eye. Moisture meters and inspection of concealed areas frequently reveal damage that would have been missed with a surface-only look.
Restoration Planning
Proper planning before work starts prevents costly mistakes and ensures nothing gets skipped. This includes material selection, scheduling, and a clear timeline with milestones so you know what to expect and when.
Execution
The actual work follows the established plan in the right sequence:
Structural repairs where needed
Roof system restoration or replacement
Exterior repairs to siding, windows, and gutters as needed
Interior repairs to drywall, insulation, and flooring
Systems restoration if electrical, plumbing, or HVAC were affected
Roof Panther handles all of these components. You don’t have to coordinate multiple contractors or worry about handoff gaps between trades.
Final Verification
The job isn’t done until everything has been checked:
Final inspection of all completed work
Walkthrough with you to review everything and answer questions
Cleanup and debris removal
Warranty documentation for completed work
Common Storm Damage Questions
How long will the restoration process take?
It depends on the extent of damage, material availability, and insurance processing time. A roof replacement might take one to two days of actual work, but the full process from storm to completed restoration typically runs two to six weeks. Major structural repairs take longer.
Can I stay in my home during repairs?
For exterior-only repairs, usually yes. If the damage is significant enough to affect essential systems or if mold remediation is required, temporary relocation may be necessary. Your policy’s additional living expense coverage handles that cost if it comes to it.
Will filing a claim raise my rates?
A single storm claim for a widespread event, meaning one that hit many homes in your area, is unlikely to significantly affect your rates. Insurance carriers can’t raise rates on everyone affected by the same storm event. Your claims history over time matters more than any single claim.
What if the insurance offer seems too low?
You have options. Request a re-inspection with your contractor present. Submit a detailed supplement with documentation of items that were missed. For significant disputes, your policy likely includes an appraisal clause that provides a formal process for resolving disagreements.
Why Local Matters After a Storm
Out-of-town contractors can do competent work. But when you hire a contractor from another state who’s in Champaign for two weeks after a major storm, you have no practical recourse if problems develop later. They’re gone. You’re left with a warranty from a company that doesn’t exist locally.
Roof Panther is based here. We’ve been working in Champaign County for years, we know the local building codes, we have established supplier relationships, and we’ll still be here when you need us. That accountability is worth something, and it’s something the storm chasers genuinely can’t offer.
We handle residential roofing, siding, gutters, windows, and other exterior components under one roof, which means your storm restoration can be coordinated as a single project rather than a patchwork of separate contractors who aren’t talking to each other.
Getting Started
If your home has been hit by a storm, here’s the sequence:
- Make sure you and your family are safe
- Document the damage with photos and notes
- Contact your insurance carrier to report the claim
- Call Roof Panther for a professional damage assessment
- Schedule a time for us to meet with your adjuster on-site
- Review our restoration plan and timeline
- Let us handle the work while you focus on everything else
For anything storm-related in the Champaign area, call us at (217) 530-8570 or use the form below. If you’re dealing with active water intrusion, call first.
Roof Panther serves Champaign, Urbana, Savoy, Mahomet, Rantoul, Danville, and surrounding Central Illinois communities. Licensed in Illinois (#104.018415), bonded, and insured.
Our Credentials

Licensed
In Illinois (#104.018415) and growing

Bonded
For your peace of mind

Insured
With high limits

Guaranteed
With a workmanship warranty
Contact Us! (Please provide your contact information below.)
We Look Forward To Working With You!
Roof Panther
903 N High Cross Rd. Urbana, IL 61802
By Appointment Only
Phone
(217) 530-8570
roofpanther@gmail.com